Volume 9 · Issue 2 · March/April 1999 | Download PDF
by By G. Edward Jeffries, M.D. with Prosthetic Consultants John Angelico, CP, Al Denison, CP and Jim Kaiser, CP
Editors note: This article begins the discussion of fitting of the various levels of lower limb amputations. In each article, the author will discuss the considerations that apply to that particular level of amputation. General discussion of joints, feet, torque absorbers, rotators, and other components will follow these articles on specific levels for fitting. Readers will be able to put together all the information when the series is completed so that an improved level of understanding of the design, manufacture, and fitting of a prosthesis will be obtained.
Background
Hip Disarticulation (HD) amputations are surgical procedures in which the lower limb is removed through the hip joint itself. Hemi-pelvectomy (HP) amputations are surgical procedures in which the lower limb is removed including a portion of the pelvis to which the lower limb is attached. Occasionally an amputee with an extremely short trans-femoral (above-knee) amputation is fit as a hip disarticulation when there is not enough femur (thigh-bone) remaining to control a typical above-knee (AK) prosthesis. Since these are much less common levels of amputation than trans-femoral (AK) or trans-tibial (BK), typical prosthetists get far less experience in fitting amputees of this type.
It is well demonstrated, however, that a highly motivated amputee who is willing to work hard and able to find a qualified and expert prosthetist and excellent physical therapist is capable of very satisfactory use of an HD or HP prosthesis for walking and other daily activities. It requires significant effort to find a prosthetist with skill and experience with this type of prosthesis and considerable work to get a good fitting but it can be done. Amputee Coalition President Mary Novotny is an excellent example of a person with a hip disarticulation amputation who has successfully worn a prosthesis most of her waking and working hours since she was a teenager. Many others successfully wear HD and HP prosthesis for their active daily lives. Some use supplementary assistive devices such as canes or crutches, but many do not.
Design Considerations
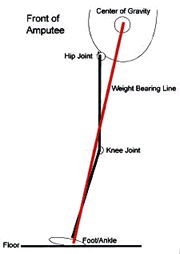
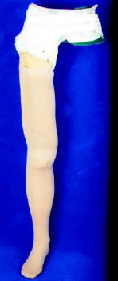
The currently accepted design for HD and HP prostheses was developed by Colin McLaurin in 1954. It was referred to as the “Canadian” type of prosthesis and is characterized by a limb with a rigid or semi-rigid socket attached to a mobile hip joint, a mobile knee joint, and anankle/foot unit with appropriate connectors in between the joints.
The joints are kept stable by the fact that the weight bearing line passes behind the hip joint and in front of the knee joint during parts of the gait cycle when weight is actually being borne on the prosthesis. These weight-bearing characteristics keep the hip and the knee from collapsing while the amputee is bearing weight on the limb. This was a unique concept when it was introduced allowing amputees to be fit without the locking joints that had been used previously and tremendously improving gait and ease of walking.
Creating the Socket
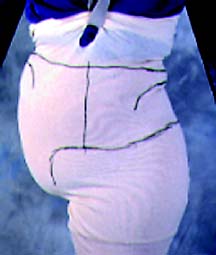
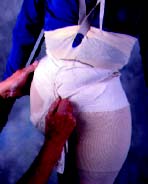
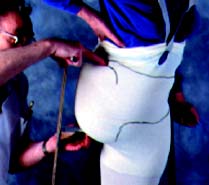
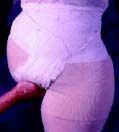
In the last issue of inMotion the Prosthetics Primer article discussed creation of a socket. With the HD and HP prosthesis these principles are followed. Briefly, the amputee dons a stockinet which fits snugly and which the prosthetist can mark with certain critical lines and features such as the iliac crests, the ischium, a vertical line in the front and on the side of the pelvis. Measurements of certain key distances such as that from iliac crest to ischium are made carefully and recorded. A plaster cast is then wrapped over the marked stockinet.
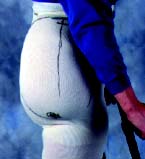
The plaster is wrapped snugly around the pelvis. It is molded around the ischium to provide stability and pressure relief. It is cinched tight just above the iliac crests to give suspension, and it is molded across the hips to
After the plaster mold hardens, it is cut off the amputee, reassembled, and filled with plaster of paris to create a positive model of the amputee’s pelvic region. After the plaster model hardens, it can be peeled out of the cast and the marks originally placed on the stockinet can be seen where they transferred to the model. The model can then be adjusted or rectified by removing some plaster with a rasp where the prosthetist believes it needs to be tighter and adding plaster where it should have relief of pressure
< Figure 6. After thin layer of plaster is applied, bands of plaster bandage are used just above iliac crests to define shape of upper socket. When this area hardens, more plaster is applied to provide full cast of pelvic region.
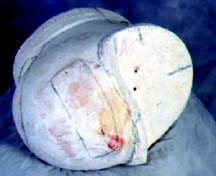
After the plaster mold hardens, it is cut off the amputee, reassembled, and filled with plaster of paris to create a positive model of the amputee’s pelvic region. After the plaster model hardens, it can be peeled out of the cast and the marks originally placed on the stockinet can be seen where they transferred to the model. The model can then be adjusted or rectified by removing some plaster with a rasp where the prosthetist believes it needs to be tighter and adding plaster where it should have relief of pressure
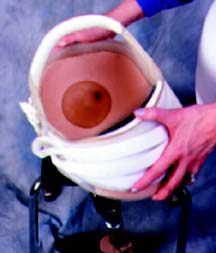
After the model is adjusted to accommodate bony prominences and sensitive area, a clear plastic check socket can be created from a thermoplastic. This check socket is used to determine fit by trying the socket on the amputee. It can be corrected by heating and molding until the fit is excellent. The clear plastic acts like a window to allow visualization of the underlying tissue that responds to pressure. The check socket can be temporarily attached to the components that will make up the complete limb to check for comfort with walking. When the amputee and prosthetist are fully satisfied with the check socket, it is filled with plaster of paris to create a positive model of the pelvis over which the actual prosthetic socket will be formed.
Sockets for HD and HP prostheses are usually either laminated from resins and fabric or formed from thermoplastics as has been discussed in previous articles in this series. It is becoming more common to use molded thermoplastics since they are usually lighter in weight, more durable, and their variable flexibility allows a more comfortable fit. The sockets are often a composite of a stiffer framework and a softer, more flexible inner socket which are carefully designed to provide the proper support, weight transfer, and comfort with as little weight as possible.
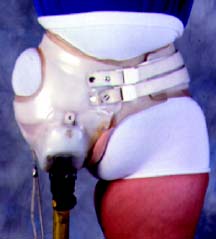
Part of the socket design is an opening that must be created in the socket to allow it to open and close around the pelvis and sound limb when donning and removing the prosthesis. This opening can be either in front, at the side, or behind. Each position has advantages and disadvantages that must be assessed in light of the particular amputee and her/his needs. It is typically held tightly closed by Velcro or buckling straps, usually more than one. It is very important the closure mechanism be strong enough to maintain the integrity of the socket during walking and be able to stand up to the rigors of weight bearing.
The socket of the prosthesis is designed to allow comfortable transfer of the body weight to the prosthesis and then to the ground when the amputee is standing on the prosthetic limb. The soft tissue of the residual hip is essentially similar to the fluid in a hydraulic system. The prosthetist can use the hydraulic characteristics of the soft tissue to spread the weight over a broader area but must capture the soft tissue in a form-fitting socket.
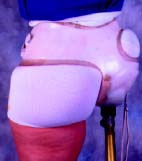
An amputee with a hip disarticulation (HD) amputation retains the ischium (also called the “sit bone”). The ischium can be used for direct weight transfer since it is a fairly broad, well- rounded bone, well adapted to bearing weight since it is what we all sit on anyway. It is important to fit the ischium carefully and to adequately cup it to prevent too high a pressure or “hot spot” which could cause tissue break down. It is also important to prevent excessive movement around it since this shear force can cause tissue abrasion and break down very quickly. It is now common for the prosthetist to “capture” the ischium in an ischial containment system that allows better stabilization of the prosthesis in the medial-lateral and antero-posterior directions. The fitting of this portion of the prosthesis is one of the most demanding and critical portions of the entire fitting process.
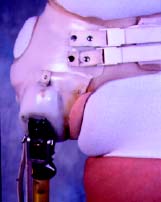
The suspension of the HP socket is similar to the HD prosthesis except there is no iliac crest on the amputated side. Therefore, the limb simply presses against the soft tissue snugly and is suspended by friction on the amputated side and pressure on the sound side. This is not as secure as an HD fitting and allows more pistoning but is still tolerated if done very carefully.
The skillful casting of the residual pelvis and creation of a corrected model of the patient’s residual limb are the first critically important steps in creating a good prosthesis. After the plaster model is created, it is used to make a clear plastic check socket. This step allows the prosthetist and amputee to determine adequacy of fit and make a preliminary assessment of comfort. The check socket can be modified as needed and even set up with the rest of the limb components. When the check socket has been determined to be satisfactory (which may require recasting and creation of new models and check sockets) it is used to create the final model upon which a real socket is made.
Components of the Prosthesis
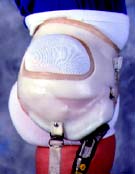
An attachment for the hip joint of the HD or HP prosthesis must be built into the socket of the prosthesis as it is created. Placement of the hip joint is usually anterior (in front) on the socket of HD prostheses since placement under the socket would make sitting a problem because the hip joint would raise that side of the socket too much for the amputee to sit level. Since HP amputees do not have an ischium, the joint can be placed directly under the socket. There are several hip joints available by the major manufacturers. Some fittings use a hip flexion bias system first suggested by Haslam and Wilson. This consists of a spring-loaded hip joint which causes the hip to begin to flex forward before the knee reaches it maximum forward travel. This shortens the effective length of the leg, allowing the amputee to swing the limb forward without vaulting (going up on tiptoe on the sound leg) in order to allow the prosthetic foot to clear the ground.
Another useful component is a rotator/turntable that allows the knee and shin to be rotated in relationship to the hip so that the prosthetic leg can be crossed over the sound leg. A locking mechanism prevents the unit from rotating unless a button is depressed.
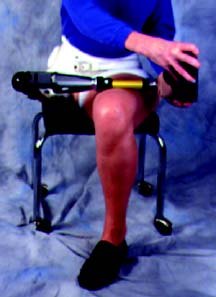
Knee joints for HD and HP prostheses are chosen on several criteria which include weight, stability, reliability, swing and stance phase control, and ease of use. Some amputees are finding benefit from one of the four-bar type knees available because they cause the prosthesis to effectively shorten during swing phase. This helps prevent the need for vaulting on the sound leg and allows the prosthetic toe to clear the ground during swing phase. More details of knee selection will be discussed in a future article in this series. It is important to select the knee with the activity level and type of activities which the amputee wishes to pursue. This is definitely not a case of “one type fits all.”
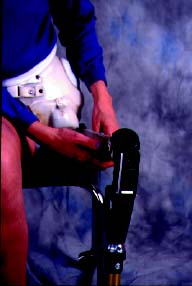
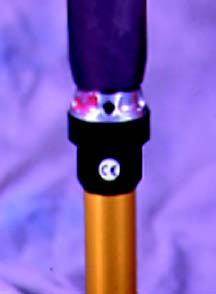
Another important component for the HD and HP prosthesis is a torque absorber that allows the foot to rotate in relationship to the pelvis, mimicking the internal/external rotational action of the normal hip joint. Normally the hip joint allows 10-15 degrees of internal and external rotation. This allows the opposite side of the pelvis to rotate foot. When the hip joint is removed by amputation, this rotation is lost. If the socket fits snugly enough to control the prosthesis, it will not allow this amount of rotational motion and will prevent the amputee from swinging the sound foot as far forward as it should while bearing weight on the prosthesis. This allows two possibilities, neither of which is good. One is to twist in the socket, leading to tissue breakdown. The other is to not take a step of normal length with the sound leg. This problem can be largely eliminated by a torque absorber.
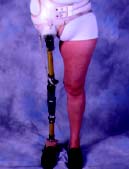
There are also a large number of feet available and appropriate to the HD and HP level of prosthetic fitting. The type of foot chosen should fit the life style of the individual. It should also be matched with the other components chosen so that the overall system is neither too bouncy nor too “dead” for the amputee. There are people for whom the Solid Ankle Cushion Heel (SACH) foot is appropriate and people who will benefit from a dynamic response type foot. It is important to choose a foot after full discussion between the amputee and the professionals. The goal should be a normal gait with minimal weight and good energy conservation which will allow optimal function.
It is important to select the components and build the limb with care about weight because an HD or HP limb can easily weigh 10 pounds or more with the socket, components, connectors, aesthetic covers, and other parts. This weight is tiring, hard on the tissue of the hip and pelvis, and slows down walking. By their very nature, these limbs are heavier than other levels of prostheses because they must replace more of the body and the socket must enclose the largest part of the body. Every effort must be made to keep the limb as light as function will allow. Weight in the lower part of the leg toward the foot is even harder to carry than weight near the hip because of leverage. It is also important to use shoes which are as light as practical because heavy shoes create a lot of extra stress on the hip region and promote fatigue.
Conclusion
Fitting HD and HP level amputees successfully is certainly one of the most demanding tasks in lower limb prosthetics, however, wide experience has shown that it can be done very successfully. Several key ingredients must be present for optimal outcomes:
· The amputee must be highly motivated, willing to work hard, persistent, and able to endure some disappointments and failure in order to ultimately achieve the end goal. It is critically important for the amputee to be willing to work diligently on extensive gait training to master a HD or HP prosthesis if optimum function is to be obtained.
· The prosthetist must have excellent experience in these uncommon and demanding fittings and be willing to listen, cooperate, adjust, persist, and work very hard to achieve a superior fitting.
· A knowledgeable physical therapist who has experience in teaching gait to amputees with HD and HP levels of amputation is critically important to attain the optimal level of prosthetic usage.
·There should be a high level of commitment to teamwork by all members of the team so that problems can be solved, frustrations overcome and a satisfactory and usable prosthesis obtained and used.
If the amputee and other members of the team are willing to work hard together, in the majority of cases a successful fitting can be attained; however, an excellent outcome involves all these ingredients working together at the same time for an excellent outcome.
Amputee Coalition is interested in prosthetic user ideas and tips for inclusion in Prosthetic Primer articles in the future and to develop Amputee Coalition “Fact Sheets” for members. Please send your comments and ideas to:
inMotion Editor
900 E. Hill Ave., Suite 205
Knoxville, TN 37915


